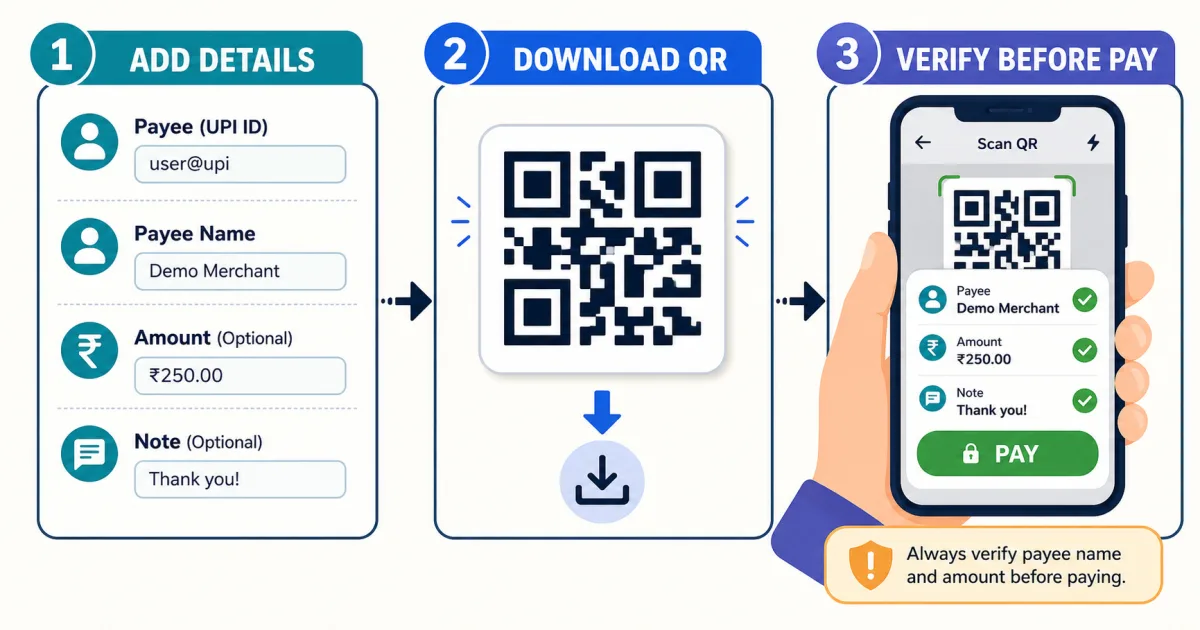
The short answer
Open the UPI QR Code Generator, enter the payee UPI ID and name, choose Fixed Amount or Any Amount, and add an optional payment note. The QR updates locally in the browser. Download it as PNG, SVG or PDF, then scan the exported file with a UPI app and verify the resolved payee and amount before sharing or printing it.
How to create the UPI QR—6 steps
Enter the UPI ID. Use the address linked to the account that should receive the payment. A format check catches obvious typing problems but cannot confirm ownership or account status.
Add the payee name. Use a recognizable personal or shop name so the payer has something useful to compare with the name resolved by their UPI app.
Choose Fixed Amount or Any Amount. Use a fixed amount for a particular bill. Omit it for a reusable counter, donation or tip QR where the payer enters the total.
Add an optional note. A short invoice, order or purpose label can help both parties understand the payment. Do not include secrets or sensitive personal information.
Add a logo only if useful. Keep it small and simple. The selected image is processed in the browser, but visual changes can still affect how reliably other phones scan the code.
Download and test. Scan the exported file—not only the preview—and confirm the recipient, amount and note in a trusted UPI app.
Fixed amount vs. payer-entered amount
| QR type | Best for | What the payer sees |
|---|---|---|
| Any Amount | Reusable shop counters, tips, donations or variable bills. | Payee details are filled; the payer enters the amount. |
| Fixed Amount | One invoice, fee, product price or checkout total. | Payee and amount are prefilled for review; final behavior is controlled by the UPI app. |
What the QR code actually stores
A QR is an image representation of text. In this case, it represents a upi://pay intent containing
fields such as the payee address, displayed name, optional amount, INR currency, note and a generated reference.
It does not contain your UPI PIN, bank password, OTP or a confirmation that the account is genuine.
NPCI's UPI FAQs describe QR integration as storing merchant information such as the UPI ID and amount so the payment app can show that information after scanning. The app—not the printed QR—performs the account resolution and payment authorization.
Which download format should you choose?
- PNG 512px: suitable for chat, email, a small web card or ordinary screen display.
- PNG 1024px: better when the image may be resized or placed in a larger digital design.
- SVG: stays sharp at large print sizes because it is vector-based.
- PDF: useful for a printable counter card containing the QR and payment details.
Do not crop the square, place text over it, use a low-contrast background or print it so small that a phone cannot focus. Leave a clear light margin around the QR and test the final physical print from a normal customer distance.
How to test the QR safely
- Download the exact file you plan to publish or print.
- Scan it using a phone other than the one used to create it, if possible.
- Read the payee name and UPI ID resolved by the app; do not rely only on the name printed beside the QR.
- Confirm that a fixed amount and note match what you intended.
- Cancel before authorization if you are only testing. You do not need to enter a PIN to inspect the payment screen.
- For a business display, make a small real test payment and confirm receipt in the receiving account before publishing widely.
Important safety limits
- Generating a QR does not verify the UPI ID, recipient identity or legitimacy of a business.
- A person never needs to scan a QR and enter a UPI PIN to receive money; that action authorizes a payment.
- Do not trust payment screenshots. Check your own UPI app or bank statement.
- A payment note is descriptive text, not an invoice, receipt or bank-issued transaction record.
- UPI app and bank limits can vary, so a QR can be valid even when a particular payment is declined.
Related UPI guides and tools
Sources and methodology
- NPCI: About UPI — UPI interoperability, virtual addresses, QR and intent payments.
- NPCI: UPI FAQs — QR integration, UPI PIN and transaction behavior.
- NPCI: UPI interoperability guidelines — required QR and intent support for BHIM UPI apps.
- NPCI: Fraud Awareness — scanning and UPI PIN safety.
Tool-specific statements were checked against the current Toolsda generator: QR construction and logo processing happen in the browser; fixed and payer-entered amount modes are supported; and exports are available as 512px or 1024px PNG, SVG and printable PDF.
Frequently Asked Questions
Can a UPI QR code include a fixed amount?
Yes. A fixed-amount QR includes the amount in the UPI payment instructions so the payer's app can prefill it. The payer should still inspect the amount and recipient before authorizing, and app behavior can vary.
What is the difference between a static and dynamic UPI QR code?
A reusable static QR usually carries the payee details without an amount, so each payer enters the total. A fixed-amount or dynamic QR also includes an amount and is better suited to a particular bill or checkout total.
Does one UPI QR work in GPay, PhonePe, Paytm and BHIM?
A standard interoperable UPI QR is intended to be readable by compliant UPI apps. NPCI requires BHIM UPI apps to support scanning BHIM UPI QR codes, but users should test the finished code in more than one app when broad compatibility matters.
Should I download the QR as PNG, SVG or PDF?
Use PNG for messages, websites and ordinary screen use; 1024px PNG gives more room for resizing. Use SVG for sharp large-format printing and PDF for a ready-to-print counter card. Always scan the exported file before publishing it.
Can I put a logo in the center of the QR code?
Yes, Toolsda can place a locally selected logo on a white badge while using high QR error correction. Keep the logo modest, preserve clear space around the code and test the exported image on multiple phones because heavy branding can reduce scan reliability.
Does creating a QR confirm that payments were received?
No. The QR only contains payment instructions. Confirm every successful payment in your own UPI app or bank account and match the transaction reference; a payer's screenshot can be altered.